Search My Blog

Sunday, October 31, 2010

Happy Halloween!

Hi everyone!
Me and Jack just wanted to wish you a Happy Halloween!
We hope you had lots of fun playing spooky party games and ate lots of yummy sweets!
If you carved a pumpkin we would love to see them. Post a comment with a link and we will have a look!

Saturday, October 30, 2010

Iggle Piggle and Upsy Daisy pumpkins!

So it's Hallo's Eve and I have been busy carving pumpkins today!
I used Iggle Piggle and Upsy Daisy from my In The Night Garden Pumpkin Stencils to create both these pumpkins. You may also be interested in looking at my Makka Pakka and Haahoo pumpkin results.
Jack also joined in and created a super sparkly pumpkin using glitter and stars!

I hope you have a fantastic Halloween!

Jack decorating his little pumpkin.

Upsy Daisy Pumpkin.

Iggle Piggle Pumpkin!

Wednesday, October 27, 2010

Pink Lining Pumpkin!

So, I had an idea in mind for a competition Pink Lining are currently running on Facebook.
I wanted to carve a different pumpkin using the Pink Lining logo and use it with my Yummy Mummy bag in some creative way!
I went and purchased a few pumpkins earlier today with a little help from Jack to keep me busy for the few days leading upto Halloween! (Keep an eye out for more Pumpkins!)
I was keen to get to work and couldn't wait until tomorrow so I printed out the Pink Lining logo and set to work at 9.30pm this evening and finished at about 10.30pm (didn't take much time considering the letters have lots of curves!)

Tuesday, October 26, 2010

Nûby No-Spill Convert-a-cup Review

The lovely people at Nûby kindly sent me a Convert-a-cup for Jack to review. It claims to be spill proof; this was something I was eager to test! The video below shows just how easy it is to assemble the cup into the beaker with handles; there are also pictures showing each stage the cup converts too.


I am amazed that a single cup can convert into four different cups which cover each stage of  a child's transition from a bottle to a open top cup. Which means you only ever need to buy one cup! Each stage a different piece is removed or attached. It can convert from a beaker with handles to a beaker without handles; a cup with handles to a cup. The cup itself is BPA free and is very light weight even with liquid in. It can hold 240ml. The handles allow smaller hands to grip it easily and should only be used with children over 6 months.


The cup encourages natural drinking action and oral development. The teat has Touch Flo technology which means as soon as your child puts the spout into their mouths and starts drinking; only then is the liquid released. The teat and top of the cup are all one piece and made out of silicone. A fully flexible lid is something I have not seen before and was quite surprised by it!


Convert-a-cup teat and lid
I was a little worried the lid may fall off or even leak as it doesn't screw into place; but the lid just snaps over the cup and forms a tight vacuum seal around the top of the cup. There was no liquid coming out of the teat or the edges when I shook it!

I even shook the cup and still no drips!
Jack loved drinking from this cup and even shared it with Iggle Piggle! This Nûby cup will help Jack to learn how to drink sensibly from an open top cup. There is no need for me to worry about him dropping a glass onto the floor! A perfect cup and I would definitely recommend this to anyone parent trying to encourage their toddler to drink from a "big boys cup"!
Jack sharing his juice!

Monday, October 25, 2010

Happy 23rd Birthday!

Well today it's my birthday!
I have had a lovely day and got everything I could have wanted! My family are taking me out for a meal to a lovely restaurant.
Check back tomorrow for Jack's review on Nuby's no-spill convert-a-cup!

Friday, October 22, 2010

Devil Jack!

Stuck for ideas for your little ones Halloween costume?
Why not take a look at the range Clothing@Tesco have. They have a costume for everyone; kids, men and women! They also currently have a huge 50% off each costume! There is no excuse not to dress up for Halloween!
I have included some pictures of Jack modelling the Devil Costume.
It's an all in one costume which has 3 Velcro fastening at the back (easy in and out!). It comes with a gorgeous hat which has a Velcro fastening to keep it on! There is a cute devil tail at the back of the costume to give added Devil effect! The wings are attached to the costume so they don't fall off. Jack wore this costume over his clothes and there was enough room to still move about as you can see in the video! (sorry the video is 'skinny' I was holding the camera the wrong way)

Jack in his Devil costume!
The cute little tail!

Thursday, October 21, 2010

Our trip to see In The Night Garden Live! (Part 2)

Last week you may have read my post about going to see In The Night Garden Live!
Well, we went again on Wednesday 20th October to see the Pinky Ponk show.
Thankfully my alarm went off at 6.30am (it's still dark at that time!) which allowed me to make myself look half human and get Jack ready without rushing around. I had packed the bag the night before just encase the alarm didn't go off! We were all set ready to go by 7.30am.
After a slow and careful drive (it was icy on the roads) we arrived at Cannon Hill Park for about 8.45am. We were one of the first people there! (Take about being keen!) Although we had to stand outside in the FREEZING cold for 30 minutes it was well worth it; we had amazing seats and Jack enjoyed it so much more!
He started to cry as we were waiting to go in. I am guessing he remembered what was inside the huge dome!
As with the Ninky Nonk show, I felt the show was well structured and all the night garden characters appeared. You may be asking yourself why I went twice? Well, there were two different stories. The Pinky Ponk show was about Makka Pakka washing each of the characters faces and in the Ninky Nonk show Iggle Piggle lost his blanket.
I have some pictures which I will post below. I really hope they do another live show next year as I think Jack would enjoy seeing it again.

At the start!
Makka Pakka washing Iggle Piggles face!
The tiny tiny Pontipines having their faces washed!
The Titifers which were projected onto the dome walls.
Now it's the Tombliboos turn to have their faces washed.
Makka Pakka washing Upsy Daisys face.
Goodbye everyone!

Tuesday, October 19, 2010

Make your own Halloween costume!

Here are some ideas for some inexpensive home-made costumes.

Bat costume

  • Black hooded top
  • Black Umbrella
  • Black Felt
  • Safety pins or needle and thread
  • Scissors
Start by removing the handle from the umbrella and then cutting the umbrella in half. This will make the bat wings. You may need to use some tools or even a saw to disassemble the umbrella.
Sew or use safety pins to attach the cut edge of the umbrella to the back of the arms of the hooded top. Make sure there are no sharp edges on the wings.
Cut ears out of black felt and use a needle and thread to sew them onto the hood of the top.
If you don't have an umbrella you can cut mini wings out of felt and pin them in place.

Ghost costume
  • White cloth fabric (about 3 yards)
  • White top with hood
  • White and black make-up
  • White glitter body spray
Make a poncho out of the white cloth fabric by cutting a hole in the middle of the material (make sure it is large enough to slip over head).
Put on the white top and poncho. Paint face with white make-up and spray hair with the glitter body spray. Rub a little black make-up safely under eyes. 
Your ghost costume is complete!

Mummy costume
  • White top
  • Large white sheet
  • A helper
  • White and black make-up
  • Baby powder
Put on the white top and tear strips from the large sheet. Ask someone to tie all the strips around you. Paint face with the white make-up, adding darker circles around eyes. For a more realistic effect, sprinkle baby powder in your hair and add a little on your sheet strips!

Sunday, October 17, 2010

History of Halloween and it's traditions

The festival of Halloween in the UK is over 2000 years old, dating back to the time of the Celts (600 BC-50 AD). The Celts celebrated the end of summer and the gathering in of the harvest with a festival called 'Samhain', which took place on the night of 31 October. Even then, this date had links with ghosts and the spirit world, as on this night the Celts believed that the boundaries between our world and the next would weaken, allowing the souls of dead to cross over and communicate with the living.


A large part of the celebration involved the building of huge bonfires, which were thought to welcome friendly spirits and ancestors, but ward off those considered dangerous. People would dress up in animal heads and skins, and burn sacrifices and gifts in thanks for the harvest. Samhain was also a time for divination and the telling of fortunes. Apples feature widely in these divination techniques. For example, when bobbing for apples, a tradition that still survives until today, the first person to take a bite out of an apple would be the first to marry that year. In addition, when peeling an apple, the longer the unbroken length of peel, the longer you would be destined to live.


Following the invasion of the Romans in 43 AD, two Roman festivals came to be celebrated at the same time as Samhain. The first was Feralia, a day when the Romans commemorated the passing of the dead. The second was a day in which they honoured Pomona, the Roman goddess of fruit trees who was symbolized by the apple. The Romans were very open to the cultures of people they invaded, and they sought to merge their beliefs with those of the indigenous Celts. It is perhaps easy to see why these two festivals became linked closely with Samhain.


Christianity had spread into Celtic lands by the 800s and the Christian church appears to have practiced its usual policy of adopting pagan celebrations by converting Halloween into a Christian observance. By moving the old Christian festival of All Saints Day to 1 November, however, they maintained the link with remembering the dead. On All Saints Day, a mass was held to honour the saints and martyrs, and this was preceded on the day before (All Hallow's Eve or Eve of All Saints - in Old English, hallow meant holy) by an overnight vigil. According to the early Christian church, this day also marked the release from purgatory of all souls for 2 days. All Souls Day, which commemorated the faithful departed, followed on 2 November. Together, the three festivals - the Eve of All Saints, All Saints Day and All Souls Day - became known as Hallowmass.


The custom of 'trick-or-treating', today a large part of Halloween celebrations, could possibly have part of its roots in the tradition of the baking of soul cakes. This was an important feature of All Souls' Day (similar to the way we associate hot cross buns with Good Friday today), when beggars would wander from house to house, receiving gifts of food and money. In return for a soul cake, these 'soulers' would be expected to say prayers for those who had recently died, to speed up their passage through purgatory and into heaven. The 'trick' part of the custom appears to have arisen in the USA in the 1930s, where Halloween became to be associated with the playing of pranks and jokes.


Although the Church was successful in establishing Hallowmass as a Christian festival, many of the populace continued to practice the ancient customs and traditions linked with Samhain. With the reformation of the Church in the 16th century, celebrations of this sort were discouraged even more. However, following the Gunpowder Plot in 1605 many traditional Halloween practices, especially the building of bonfires, were transposed to 5 November (now known as Bonfire or Guy Fawkes Night). Although in England the celebration of Halloween gradually fell out of fashion in favour of Bonfire Night, the tradition was maintained for longer in both Ireland and Scotland, because of the strong Celtic links in these countries.


The resurgence in the celebration of Halloween that we have seen over the past 20 years or so, with its emphasis on dressing up as ghosts and witches, has largely been imported from the USA. Halloween and its more pagan traditions were first brought to the USA in the mid-1800s, when huge numbers of Irish immigrants fled to the USA following the Irish Potato Famine. Over time, the festival and its traditions evolved and crossed back over the Atlantic - giving us the celebration that we know and love (or hate!) today. The celebration that we today know as Halloween dates back to an ancient festival of the Celts - Samhain. Despite the passing of 2000 years, it is still possible to trace some of the traditions we associate with Halloween - bonfires, and the link with ghosts and the spirit world - back to this early celebration of the end of summer and the gathering in of the harvest.

Saturday, October 16, 2010

Makka Pakka and Haahoo pumpkins!

Hi everyone!
Last night I tested out the In The Night Garden pumpkin stencils with a little help from my sister.

We brought two small pumpkins for 50p each (what a bargin!) and got to work. We made a silly mistake and cut the lid small, which meant we couldn't get out hands in to scoop the middle out! But after a little pushing and pulling we managed to squeeze our hands in (mine are rather sore this morning!)

The stencils did work very well; but in my option I think the Haahoo one worked the best. I ended up doing both pumpkins as my sister didn't have the patience to punch the design onto the pumpkin!
Enjoy!

Haahoo and Makka Pakka
Haahoo pumpkin
Close up of Haahoo pumpkin
Makka Pakka pumpkin
Side view of Makka Pakka


Friday, October 15, 2010

My In The Night Garden Pumpkin Stencils

Hi everyone.
I've had a go at making a few In The Night Garden pumpkin stencils. I've done Iggle Piggle, Makka Pakka, Upsy Daisy and a Haahoo. Who said Halloween had to be scary! I am quite excited to see if they work (I will be trying them out this weekend and posting pictures!); I hope they give you some ideas on how to create a different, fun pumpkin. If you have any requests please E-mail them to me and I will try my hardest to transform them into pumpkin stencils for you to use.

You can follow the same steps I posted yesterday and print out these stencils and tape them to the pumpkin.

You can print as many as you like and I am happy for you to share these on your blog (with a link back to me!)
Happy pumpkin carving!
Haahoo Pumpkin Stencil

Iggle Piggle Pumpkin Stencil

Makka Pakka Pumpkin Stencil
Upsy Daisy Pumpkin Stencil

Thursday, October 14, 2010

My tips on how to carve a pumpkin!

Hi everyone. Halloween isn't far away and I thought I would share with you something I enjoy doing at Halloween. I love carving pumpkins! Over the years I have created some wonderful designs (someone thought it was so amazing last year they stole the pumpkin!)
This is my pumpkin from Halloween 2009

What you will need:

  • A medium sized pumpkin
  • A Tee-light
  • Printer and paper
  • A tablespoon or pumpkin scoop
  • A small nail, push pin or a pumpkin poker
  • Tape
  • Flour
  • Serrated knife or craft knife
Instructions
First you need to prepare your pumpkin by cutting a hole in the top to make a lid. When doing this make sure you angle the knife inwards so your lid sits on top of the pumpkin and doesn't just fall through! Once you have made a lid you will need to scoop out the seeds and strings using the spoon. Scrap some of the flesh from the inside of the pumpkin until it's about an inch thick all the way around (or just where you are going to carve!)

Cat carving pattern
Choose a pattern which you want to carve onto your pumpkin. The Internet is full of templates if your search; I have included a few which I like carving! You will need to save and print out the pattern you wish to carve. Once you have done this trim off the excess paper and tape it onto your pumpkin. If your pumpkin is quite lumpy you can dip the paper into vegetable oil (but this can make the project quite slippery!) You can also make small cuts into the paper where it bunches so it lies flat onto the pumpkin.
Jack O'Lantern carving pattern
Once you have attached your pattern to your pumpkin you will need to poke holes through the pattern with a nail, push pin or pumpkin poker. Make the holes about a cm apart. This step can take quite a while depending on the pattern you choose, so be patient! Place the pumpkin on your lap and work away at it; the end result will be well worth it! Once you have copied the pattern onto the pumpkin you can remove the paper. You can rub flour all over the  area where you poked the holes. This will make it easier to see them when you come to carve.
Next you need to push a nail through the pumpkin skin where you want to start carving. Turn and push until it's all the way into the pumpkin, then remove. Repeat anywhere you're going to need to start carving (eyes, nose and mouth) You want to do all the pushing before you start carving as the pumpkin is stronger at this point. Once you start carving the pumpkin it becomes weaker and applying pressure may cause it to break.
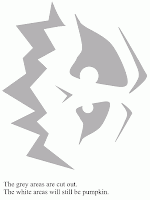
Pumpkin face carving pattern
Using your nail hole as a starting point, cut the design with your serrated knife. Start somewhere in the centre of the design to avoid putting too much pressure on areas already carved. Using a sawing motion cut out your design, using very light pressure; take your time and allow the sawing to do the work rather than applying pressure and forcing it. When making curves, just slightly turn the knife. When making sharp corners, remove the knife and re-insert it at an angle.
To remove pieces, push them out from the inside. For larger pieces, you may want to cut them into smaller bits and remove them in sections. Wipe over your pumpkin using a damp cloth to remove any remaining flour or oil.
Once your pumpkin is all carved, use a Tee-light or pumpkin light to light it up. Light the candle and place it on a piece of tinfoil inside the pumpkin. Put the lid on and let it sit for a minute. Remove the lid and there should be a smoke mark on it. You will need to cut a vent in the lid where the smoke mark shows.
I hope you enjoy carving your pumpkins as much as I do!
Keep checking back to see my pumpkin this year!
If you carve a pumpkin this year; please e-mail me your pictures and I will feature them in a special Halloween pumpkin post!

Wednesday, October 13, 2010

Our trip to see In The Night Garden Live!

Today me and Jack finally got to go and see In The Night Garden Live at Cannon Hill Park, Birmingham. I think I was more excited than Jack was!
I planned to get up at 6:30am to miss the rush hour traffic and get good seats. But.... my alarm clock didn't go off for some reason; and I woke up at 8:06am! The show was due to start at 9:30am and we live just over an hour away from Birmingham! I didn't even have chance to look at the directions I had printed out the night before (thank god I did!)
I have never go ready so quickly in all my life! I even managed to slap a bit of make up on! Jack was still half asleep when I was getting him dressed (I bet he was wondering why I was rushing around!) After making a bottle and chucking god knows what into my Yummy Mummy changing bag; we were off at 8:20am (Great! Going to hit school and rush hour traffic!)
Luckily, it was "our day" and we didn't hit as much traffic as I thought we would! We arrived at Cannon Hill Park for 9:20am, and took a very quick walk to the show dome! I was so worried we would have really rubbish seats; but honestly where ever you sat you could see the stage (obviously it would have been lovely to sit near to the front). We just sat down and the show began!
I don't think Jack realised what was actually happening; but as soon as the music started and Iggle Piggle came bouncing onto the stage; he smiled! I have never seen him so excited and happy! I don't think he could quite believe we had actually "gone" to the night garden and all his favourite characters were right in front of him! I loved seeing his little face watching the show! I quite enjoyed it myself. 
Just after we arrived!
The show itself was well structured and we saw all the characters. Images were projected onto the walls of the dome to give the feel that you were actually in the garden with Upsy Daisy and Iggle Piggle. There were lights which stayed on during the show as some children can be scared of the dark (I know Jack is) and this made the atmosphere relaxed.
It was quite hard to get pictures as Upsy Daisy, Iggle Piggle and Makka Pakka were dancing and running about. I managed to get a few and I will share them with you. 
There are two different shows to choose from. Today we saw was the 'Ninky Nonk Show' and we will be going back next Wednesday 20th October to see the 'Pinky Ponk Show'! Each show follows a different story and lasts for just over an hour (perfect time before children start to get wriggly!) I can't wait to go back next week!
I would recommend taking your little one to a show like this; it was perfect for Jack's age. There was only 13 rows of seating, each row was higher than the one in front and no pillars or anything to block the view of the stage. The seating was like benches rather than individual seats. which meant there was room for the little ones to stand up and dance! 
Iggle Piggle
Upsy Dasiy, Iggle Piggle and the Tombliboos!
Upsy Daisy
Iggle Piggle and Upsy Daisy riding on the Pinky Ponk
Upsy Daisy and Iggle Piggle holding hands!
The gang!
Everyone asleep!

Saturday, October 09, 2010

Halloween Party Games!


These fun and easy-to-play kids' Halloween party games make Halloween a little more spooky. These ghoulish games are great for kids' Halloween parties.
Eyeball Relay
  • 1 Ping pong ball for each team (painted like an eyeball)
  • 1 spoon for each team
Divide children into teams. Give the first child on each team a spoon and a ping pong ball. Set up the course to where they have to carry the "EYE" on the spoon to the end of the course and come back. Hand off to the next child and continue until all children have played on the team. First team done wins!

Spider Web
  • Ball of black yarn
Children stand in a circle. A ball of yarn is thrown across to another child. The child holds on to a piece of the yarn and then throws the ball across to another child. Continue until a spider web is created.

Mummy Wrap
  • Toilet paper on a roll
  • Adult helper 
  • Chair
If you desire to make this a relay, then you will need a roll of toilet paper for each team, an adult, and a chair. Each child takes turn wrapping up the adult as a mummy. Don't forget to unwrap them!

Spider Relay
Divide children into teams. Set up a course for them to race on. Have first child of each team sit down, put their arms behind them and walk (AKA crab walk) to the end of the course and back. Tag the next child and repeat until all the teams finish.

Pop the Balloon
  • At least 2 balloons for each child
  • Enough "treats" for each balloon to have one
Add the "treat" inside each balloon and blow up. Tie the balloon. Put all the balloons on the floor and tell the children how MANY they may pop. The children must pop the balloons by sitting on them and bouncing. Treat ideas: spider or other types of rings, sweets, mini balls, anything small that will fit inside a balloon.

Ghost Waiter
  • Balloon for each team
  • Paper plate for each team
Divide children into teams. Set up a course for them to race on. The child has to balance a balloon on a paper plate while walking it down the course and back to their team.

Scarecrow Nose
  • Sheet
  • Scissors
  • Paint
  • Adult helpers
Before the party, paint a scarecrow on a sheet. Cut out the area where the nose is. Keep in mind the height of the children playing the game!Divide the children into 2 teams. Take one team out into the hall. The other team stays in the classroom. Have the adults hold the sheet up. The first child out in the hall puts their nose through the hole in the sheet. The children in the classroom try to guess who is the scarecrow's nose.

Balloon Sweep
  • 1 Broom for each team
  • 1 Balloon for each team
Divide children into teams. Set up a course for them to race on. The children are to run relays sweeping the balloon along the course and back to their team. First team having all their players through the course wins.

Put a face on the pumpkin
  • Pumpkin cut out of poster board
  • Orange, yellow, and black paint
  • Paintbrush
  • Double-stick tape
  • Straws (purchase more than one per child)
  • Scissors
Create the pumpkin ahead of time. Make one for each team. Use double-stick tape on the areas where you want the face to be placed. Cut out, and paint, the pieces for each of the pumpkins. Create 2 eyes, nose, mouth, teeth, stem, and a leaf for each pumpkin. These will be the pieces that the children will place on the pumpkin.Child picks up a pumpkin piece with a straw (by inhaling) and places it on the paper pumpkin that is on the wall. Tape is already on the paper pumpkin where the piece should be set. Make a relay to see which team can create their pumpkin face first.

Trick or Treat Game
  • Paper
  • Pencil
Have the children write the words "Trick or Treat" on a piece of paper. Set a timer. See how many words they can make out of "Trick or Treat". Let children eat treats while they create the words.

Walk the fence
  • Masking tape
Make masking tape lines on the floor for each team. Divide the children into teams. Have the children walk backward on line of tape on floor. Go to end of tape, turn around and walk backward to team. First team to finish; wins!

Friday, October 08, 2010

Bimbambim Book Swapping

Have books laying around and collecting dust which you no longer read?
Fancy getting a new book by swapping old books?
Want to get an exciting and fresh new novel?
If you answered yes; then BimBamBim is the perfect place for you!

The site is easy to use, you simply browse the books which are divided into sub sections to make them easier to find and select if you have the book or if you want the book.
If you select 'I Want' then you are adding the book to your 'want' list; which means you would be willing to have the book in exchange for a book you own. The site will then notify you if there is a possible swap.
If you find a book which you have and would like to swap, simply click 'I Have' and you will be able to list the book on the site.
Simple!

Did you know that less and less people are reading books for entertainment? Many classic stories are just gathering dust on the library shelves! One of the worst effects of this trend has been on children. Their vocabularies haven't been developing as well as they had been in the past. As a result, more and more children have been forced to stay back because of reading comprehension failures.
You can help develop your child's vocabulary by reading them a simple story once a day. BimbamBim enables you to swap story books for ages 0-8, activity books, education books, hobbies & interests, humor, poetry and reference. Such a simple, cost effective way to encourage your child to read!
Book swapping sites like bimbambim are wonderful because they engage children to learn. They also make sure the classic stories are never forgotten.
What are you waiting for? Dust off and get rid of the books you no longer read and swap them for something fresh and exciting on Bimbambim!

Thursday, October 07, 2010

It's official! I am a Yummy Mummy!!

Yes you heard right! I am now a Yummy Mummy with a huge thank you to the team at Pink Lining.
I received my Yummy Mummy changing bag this morning. The box was a little battered (stupid delivery men do they not know what pink lining is!) but thankfully the beautiful bag was OK!
On the outside there are 2 elasticated pockets, a front pocket with the slogan 'Yummy Mummy' and an adjustable detachable shoulder strap. Inside is a beautiful hot pink and there are 2 insulated bottle pockets, a padded changing map, a zip wet bag, a mobile pocket, a zipped pocket, a key/dummy fob, a detachable mirror (to check you are still looking yummy!) and also a pen holder! What more could a Mummy ask for! No need to carry two separate bags again!
The pattern is Oatmeal and Green Floral; perfect for the coming Autumn/Winter season. It was even wrapped in baby pink tissue paper and tied with lovely pink ribbon! Officially wrapped in pink lining!
Check out Pink Lining for a huge selection of lovely changing bags (for mums) and even bags for children! There are some beautiful fabric designs to choose from.
Happy shopping!


Inside the bag: Image from www.pinklining.co.uk